
Introduction
Entering and tracking defects, is one of the main tasks for testers. It is important that any time that a defect is found (whether it was actively being looked for or not), that it is logged. Even if you are not sure if it really is a defect, or if you think it maybe isn’t really that big of a deal; I believe it is better to log it, analyze and then if necessary close it, than it is to just ignore it. This article explains the process of software defect tracking and give recommendations on how to implement a defect tracking system.
 So what exactly is a defect? As a general definition, a defect is any aspect of the application that does not act or behave as designed or expected. This can range from the obvious cases where the application crashes, data is lost, calculations give the wrong results, etc., to more subtle cases of useability and lack of features. From a strictly test process point of view, defects are linked to the software’s requirements. A tester examines the requirements, and then writes test cases that test against these requirements. If a test fails, or if in any other way it is found that a requirement is not met correctly, then it is a defect. From a product, or company point of view, however, a defect is anything that a customer finds or would find as a problem whether there is a requirement or not. This latter definition is often more important since it is most organizations’ goal to satisfy their customers.
Entering a Defect
As mentioned, any time a defect or even a potential defect is found, it should be entered. The exact format for entering a defect will vary between organizations, and some organizations may need more or less information. Here I will provide the basic and most common information that should be included when creating a defect report. ID: A unique identifier for the defect. This ID is what is typically used, when different people are referring to the defect. When using a defect tracking system, this ID is typically generated automatically. Product: This is the product that the defect is for. If your organization only has one product this may not be necessary. Component: If your software application contains several components, e.g. database, web server, UI, etc. this field is used indicate which component the defect is in. Sometime a tester may have to guess at this, if they aren’t familiar with the architecture. Summary: A short one-line description of the defect. This is critical because the summary is often what is shown in summary reports and search results, so it must be descriptive enough so any team member (i.e. tester, developer, manager, etc.) can get a basic understanding of the problem. Description: This is where more details of the defect is entered. It is important to be as clear and complete as possible so that there is no ambiguity when reading. It should also be concise, because if it is too verbose, the reader might get lost in it and miss the point. When appropriate, include the steps needed to reproduce the problem, including expected and actual results. This will make it easier for the developer to locate the problem, and easier later on for the tester to verify that the problem has been fixed. Test Case Reference: If applicable reference the Test Case that was being executed when the defect was found. Environment: This will vary greatly depending on the type of application being tested but should at least include the version of the software being tested, and may include things like Operating System, Firmware Version, Browser, Database version, etc. Severity: As an organization, you should decide on a standard set of Severity levels. For example: Critical, Major, Normal, Minor. Some organizations may choose to have more or less, but 3 to 5 levels seems to work the best. Assigning a severity is obviously a judgment call, but it helps to prioritize defect later on. Priority: Again, an organization should also have pre-defined priority levels, e.g. P1 to P5. Typically it should not be up to the tester to assign the priority, this should be done by the management team. Often the question arises between the difference between Severity and Priority. They are quite correlated, but it is possible to have a high severity defect with a low priority. For example, if a certain actions causes the application to crash, then that is a very Severe defect, but if the conditions to cause this would almost never occur, it may be given a low priority since there may be other more easily seen defects to be fixed. An opposite example, may be a typo on a screen. This has low severity, but if the typo may confuse the user and/or make the application look unprofessional and, therefore, affect sales, the defect could be set to a high priority. Typically priority is used for developers to determine which defects to address first.
Defect Life Cycle
Although a defect is typically entered by a tester, it cannot remain with the tester, but instead needs to be fixed and then verified. This movement of a defect between different people and different states is often called the defect life cycle. Each organization will probably have a slightly different set of rules for how they want defects handled, and will, therefore, have a slightly different life cycle. Most however, will have a format similar to the following:
- When a defect is first created, it will start off a New state
- A triage meeting (see below) is held and the defect is prioritized and then set to an Open state and assigned to a developer.
- The developer fixes the defect, and checks in the code. They the set the defect to Fixed and assign it to a tester to verify it. Alternatively, if the developer either doesn’t think it is really a defect or can’t reproduce it, they may set it to a different state (e.g. As Designed or Can’t Reproduce)
- The tester verifies that the bug is fixed by testing it in the next build. The tester then marks it as Verified. Alternatively if the defect isn’t fixed they set the state back to Open and reassigns it back to the developer.
As mentioned this is a simplified life cycle and they can often get more complex with more states. It is good to try to define this ahead of time to handle all situations you may encounter in your organization. Below is an example of a defect life cycle, used in Bugzilla:

Defect Triage Meeting
A triage meeting is a meeting that brings all stakeholders (e.g. testers, manager, developers, etc) together to discuss defects. Typically, a triage meeting will look at all new defects that have been logged since the last triage meeting, any hold over defects from a previous meeting, or any defects that have been re-opened. The purpose of the meeting is to discuss the defects and clarify any details about them, and then decide which defects should be fixed, and to set the priority for fixing them. Each stakeholder may have their own agenda as to which defects get fixed and the priority of them, but it is in this meeting that a consensus should be reached. Once the defects have been analyzed and prioritized, they should be assigned to the development team to fix them.
Metrics
One reason for tracking defects, is that the data can provide metrics, that can be used when evaluating the quality of the application and in deciding when an application is ready to be released. A common defect related metric to track, is the number of new defects logged over the past set period of time (e.g. day, week, etc.) and then track that over time. Typically, there will be spike in new defects every time a new build is given to test, but over time, the number of new defects found in each period, should decline. The following bar graph is an example, showing the number of new defects that were entered on each day of the month: 
Another common metric to track is the total number defects in new/open states vs those in a verified/closed state over the life of the project. At the beginning of the project the new/open defects will be rising, but over time they should be decreasing to near zero, as shown in the example below: 
Another useful metric is a snapshot chart showing the Total number of defects, grouped by the various states, at a specific point in time. Near the beginning of a project, most defects will be New, but as the project comes to an end most should be closed. Below is an example of the chart part way through a project: 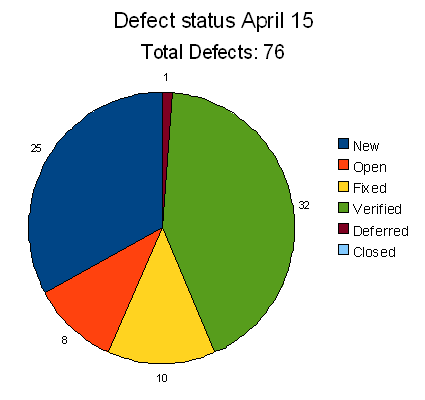
With all these metrics you can further add information by separating the data by priority and/or severity, which can put a better perspective on things. You can also separate data by components to help get a better idea which parts of an application are more stable than others. Like all metrics, however, it is important not to read too much into them, and look at them more as guidelines when making quality decisions.
Defect Tracking Software
While it is possible to manage defects using a paper based system and/or to use a Word Processor and/or Spreadsheet, I would suggest using a 3rd party application, for tracking defects. When looking for a good defect tracking system you should be looking at the following criteria: web-based: This isn’t a must, especially for a small group, but it is definitely easier to administer the application if it is web-based. The software only needs to be installed and configured in one location, and then all users can access it. multi-user: This should be a given. Even if you are a one-man show to start, it leaves room to expand. search: This is one of the most important things to look at. All systems should have some kind of searching, but check out how easy it is to use and how comprehensive it is. Does it allow searching on any custom fields? Also does the system allow for Saved Searches or Saved Filters? This is critical, because over time, you will set up and save many often used searches. reports: Check what kind of reports, if any come with the system. Are the reports useful. Also, check that you can generate custom reports that fit the needs of your organization. history: The defect tracking system should track all changes made to a defect, including comments added, and state transitions. This information allows the user to easily see the history of changes made to the defect. configurable fields: Does the system support configuration or customization. You may want to add fields that are unique to the type of project you are working on. You would probably also want control of the values that certain fields can take. configurable work flow: As mentioned earlier, each organization may have a slightly different work flow. Does the Application allow you to add new states or customize which states transitions are allowed? email notifications: This is not a must, but it is nice to email notifications for users for when defects get assigned to them or when defects that are assigned to them get modified. When I began working as an independent software developer, as I used bugzilla. It is free, mature, full featured, and covered all of my needs. I am currently using Jira, which has a few more features and a way nicer user interface. Although it isn’t free, at $10 a year (for 1 to 10 users), I think its worth it. For a list of some of the more common defect tracking systems, see the references section below.
References
- Clear Quest – https://www-01.ibm.com/software/awdtools/clearquest/ (Commercial)
- Star Team – https://www.borland.com/us/products/starteam/index.html (Commercial)
- Jira – https://www.atlassian.com/software/jira/ (Commercial): Bugzilla – https://www.bugzilla.org (Open Source)
- Mantis – https://www.mantisbt.org/ (Open Source) Trac – https://trac.edgewall.org/ (Open Source)
- Redmine – https://www.redmine.org/ (Open Source) Jtrac – https://www.jtrac.info/ (Open Source)
Note: this article first appeared in the May 2010 Issue (Volume 23, No. 5) of ASPects, The Monthly Newsletter of the Association of Shareware Professionals.
I am Victor Ewert, an Independent Software Developer and owner of Ewert Technologies. In the past I have worked as a Software Tester including working on Software Test automation.
My current technology interests include Java, JavaFX, Kotlin, Swift, Privacy and Security, and Mobile App development.


